Difference between revisions of "Xberry Pi"
(Improve port descriptions) |
|||
| Line 35: | Line 35: | ||
* '''J3''' - PS/2 keyboard/mouse input | * '''J3''' - PS/2 keyboard/mouse input | ||
* '''J4''' - 3.5 mm headphone output | * '''J4''' - 3.5 mm headphone output | ||
| − | * '''J5''' - Mega Drive compatible | + | * '''J5''' - Sega Mega Drive / Genesis compatible joystick port |
| − | * '''J6''' - | + | * '''J6''' - Raspberry Pi Zero accelerator header |
* '''J7''' - Matrix Keyboard, reset switch, NMI (MF) and MMC headers | * '''J7''' - Matrix Keyboard, reset switch, NMI (MF) and MMC headers | ||
* '''J8''' - WiFi adapter header | * '''J8''' - WiFi adapter header | ||
| Line 42: | Line 42: | ||
* '''J11''' - Joystick select header | * '''J11''' - Joystick select header | ||
* '''J12''' - VGA video output header | * '''J12''' - VGA video output header | ||
| − | * '''J15''' - | + | * '''J15''' - 3.5 mm microphone input for a cassette tape player |
=== Modifying RPi 3 cases === | === Modifying RPi 3 cases === | ||
Revision as of 10:38, 30 May 2024
The Xberry Pi (XBP) is a ZX Spectrum Next clone using a PCB that has approximately the same dimensions as a Raspberry Pi 3.
This page documents key info specific to the XBP that is not covered on its github page.
Contents
Differences between the XBP and the Spectrum Next KS1
The XBP is largely identical to a Spectrum Next KS1 but with the following differences:
- The XBP uses the much smaller Raspberry Pi 3 SBC form factor.
- No expansion slot.
- No integrated keyboard. A header is provided for connecting a Matrix keyboard.
- No second joystick port. A joystick splitter is available for a second joystick port.
- No footprint for adding a second SD card.
- No reset or NMI (Non Maskable Interrupt) buttons are on the XBP PCB. Footprints are provided for you to add these buttons if desired but these functions can be accessed via function keys.
A PS/2 splitter cable can be used to attach a PS/2 keyboard and mouse simultaneously.
PS/2 input configuration
You cannot use your PS/2 keyboard after booting a new instalation of NextZXOS on a XBP. This is because NextZXOS is designed for use on official Next computers and NextZXOS defaults to using the integrated keyboard. To fix this you have to edit MACHINES/NEXT/CONFIG.INI on your NextZXOS SD and change the ps2 line:
ps2=1
To enable PS/2 mouse input, you must enter the Next boot configuration menu by pushing the SPACE bar during boot and check the PS2 option is set to Mouse.
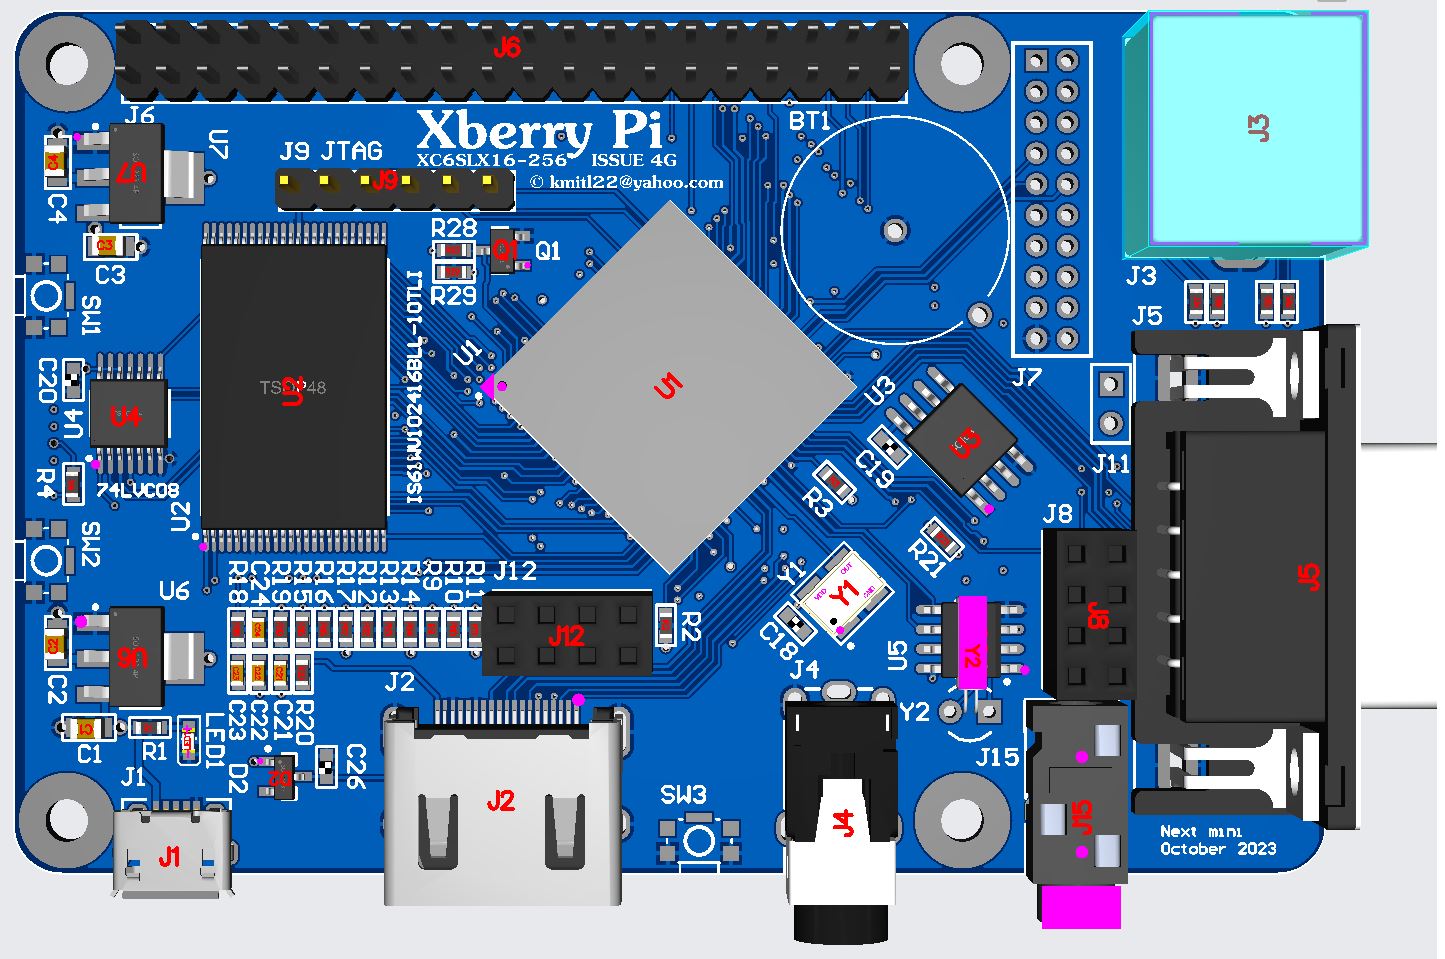
Ports and headers for XBP 4G
Note that some of the ports and headers have different names on older revisions.
- BT1 - RTC battery clip location, not attached in above picture
- J1 - Micro USB power input
- J2 - HDMI digital AV output
- J3 - PS/2 keyboard/mouse input
- J4 - 3.5 mm headphone output
- J5 - Sega Mega Drive / Genesis compatible joystick port
- J6 - Raspberry Pi Zero accelerator header
- J7 - Matrix Keyboard, reset switch, NMI (MF) and MMC headers
- J8 - WiFi adapter header
- J9 - JTAG debugging header
- J11 - Joystick select header
- J12 - VGA video output header
- J15 - 3.5 mm microphone input for a cassette tape player
Modifying RPi 3 cases
You should be able to fit the Xberry Pi into most cases designed for the RPi 3 after removing its VGA output board but one or two adjustments will be required before the PCB will fit into most Rpi 3 cases properly. You will need to use a grinder or a similar tool to create a new hole for the XBP's mic input jack and in some cases you may also need to remove a bit of plastic that separates the network socket from the USB ports, if there is one present on your case to make room for the joystick port.
Recommended power supplies
Power supplies known to work with the RPi 3 should be good enough to power the XBP such as the official RPi 3 USB power supply. Your PSU must use a Micro USB connector and provide at least 5V 2A for reliable operation.
Known hardware issues and fixes
The XBP suffers the same HDMI backpower issue as the Spectrum Next KS1. This issue causes the XBP to fail to power cycle correctly when using HDMI. The workaround is to buy an inexpensive HDMI splitter which allows you to disconnect your XBP from your HDMI display at the push of a button without having to remove and re-insert your HDMI cable every time you want to power cycle the machine such as when you want to enter the boot configuration menu, update your firmware or boot a different core.

