Difference between revisions of "FAQ"
(Added link to manual with macOS font fix.) |
|||
| (37 intermediate revisions by 4 users not shown) | |||
| Line 4: | Line 4: | ||
[[File:Figure02-TestScreenMode7.png|thumb|ZX Spectrum Next Test Screen]] | [[File:Figure02-TestScreenMode7.png|thumb|ZX Spectrum Next Test Screen]] | ||
| − | You will also get an audible intermittent tone so you know your audio is working. It's possible your display can lock onto both modes but only one being able to lock onto the audio. Choose the one with the tone before pressing ENTER. | + | You will also get an audible intermittent tone so you know your audio is working. It's possible your display can lock onto both modes but only one being able to lock onto the audio. Choose the one with the tone before pressing ENTER. Extract the files and copy over the BIN / SYS/ TMP folders to the root of your SD. |
| + | |||
| + | == How to use esxDOS with 48K mode == | ||
| + | [[File:2023-12-17 21 01 56-Window.png|thumb|esxDOS files]] | ||
| + | Your ZX Next can simulate the divMMC hardware for other machines. You can use esxDOS with 128/48K machines. You can download the latest esxDOS zip file here https://esxdos.org/index.html Download the zip and copy over the following folders BIN/SYS/TMP. | ||
| + | |||
| + | You will need to place the ESXMMC.BIN in to /machines/next/roms | ||
| + | |||
| + | Boot up your Next and press SPACE to open the configuration menu. Use the arrow keys to select 48K Mode, SPACE again and ensure DIVmmc ROM = YES. Exit and save this configuration. When your Next boots it should show the esxDOS logo just before the (c)1982 Sinclair Research Ltd message. | ||
| + | |||
| + | [[File:Pre boot machine select menu.png|thumb]] | ||
| + | [[File:2023-12-17 21 21 11-OBS 30.0.0 - Profile Untitled - Scenes Untitled.png|thumb]] | ||
== I am using VGA and I get no picture == | == I am using VGA and I get no picture == | ||
| Line 18: | Line 29: | ||
c. Use of the ZXHD or TkPie hardware expansions (only for standard Spectrum modes at 3.5MHz clock) | c. Use of the ZXHD or TkPie hardware expansions (only for standard Spectrum modes at 3.5MHz clock) | ||
Next specific programs do not have this issue as they're made taking the current HDMI timing differences into account and will continue to work in the future when the most appropriate HDMI solution is implemented. | Next specific programs do not have this issue as they're made taking the current HDMI timing differences into account and will continue to work in the future when the most appropriate HDMI solution is implemented. | ||
| + | |||
| + | == I am updating to the latest distro from GitLab or the N-Go website and my ps/2 keyboard doesn't work == | ||
| + | To use a ps/2 keyboard you need to first choose whether you have a mouse or keyboard plugged into your ps/2 port. Unfortunately you can't get to the screen where you can make this choice ''until'' you have chosen your video mode on the testcard screen... which ''needs'' the keyboard to be already working! | ||
| + | |||
| + | Download this minimal config.ini file [https://dl.dropbox.com/s/5na7sd21328jnz5/CONFIG.INI] and copy it to the '''/Machines/Next''' folder on your SD card, then try again. | ||
| + | |||
| + | When updating your distro from the official [[https://www.specnext.com/latestdistro/ Latest Distro]] page, or when using the internal keyboard on your official kickstarter 1 or 2 Next, this problem will not occur. | ||
== My monitor shows wrong image with Soviet timings(Pentagon) == | == My monitor shows wrong image with Soviet timings(Pentagon) == | ||
| Line 26: | Line 44: | ||
== HELP! My <insert game name here> doesn't work while it works on my <insert older Spectrum model here> == | == HELP! My <insert game name here> doesn't work while it works on my <insert older Spectrum model here> == | ||
This is most likely due to a specific incompatibility of said program with the Next's extra hardware. The NextZXOS loader module, provides a lot of options for loading software catering to each model's idiosyncracies but also gives you the option to disable almost all Next extra hardware in order to make it work. If, after trying everything, the software doesn't work, you need to inform the team using the official gitlab repo "Issues" (registration is required) and provide a link to a copy of your program. The team will look at the specific issue and respond/fix the issue as soon as possible. | This is most likely due to a specific incompatibility of said program with the Next's extra hardware. The NextZXOS loader module, provides a lot of options for loading software catering to each model's idiosyncracies but also gives you the option to disable almost all Next extra hardware in order to make it work. If, after trying everything, the software doesn't work, you need to inform the team using the official gitlab repo "Issues" (registration is required) and provide a link to a copy of your program. The team will look at the specific issue and respond/fix the issue as soon as possible. | ||
| + | |||
== What classic files can I load on my Next? == | == What classic files can I load on my Next? == | ||
| + | The Next supports NEXs, TAPs (preferred for classic software), SNAs, DSKs, Z80s, SNXs which can be loaded from the browser | ||
| + | menu by selecting them with the cursor keys and ENTER (or a joystick and Fire) -OR- by using the SPECTRUM command. (See Chapter 20 in the manual for details). | ||
| + | Place the files on your SD card and pick from the Browser. | ||
| + | |||
| + | == How to load from a software cassette tape == | ||
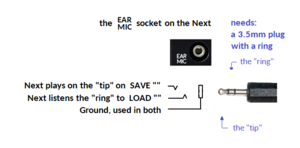
| + | For a successful load a clear signal from the player has to arrive on the "ring" part of the plug which you insert in the EAR/MIC socket of your Next, as in the picture "Next's EAR/MIC socket wiring". | ||
| + | [[File:Ear-mic-socket-1.png|thumb|Next's EAR/MIC socket wiring]] | ||
| + | The plug inserted into the Next is referred to in many descriptions as a "3.5mm stereo plug". Even if the Next always uses a single channel to load, the plug on its side has to be the same as those used for stereo (two channel) equipment, because, as stated, it then receives the signal over the "ring", which doesn't exist on "mono" plugs. That's also why the cables delivered with the Spectrum 128 and earlier models won't work: their both sides lack the ring on their plugs. | ||
| + | |||
| + | So the cable on the Next's side needs a 3.5mm plug commonly described as a "stereo" plug. The other side will depend on the output socket on your cassette player. | ||
| + | |||
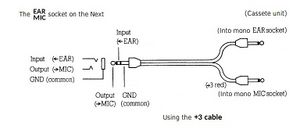
[[File:Spectrum-plus-3-tape-lead.jpg|thumb|ZX Spectrum Next/+3 Tape Lead]] | [[File:Spectrum-plus-3-tape-lead.jpg|thumb|ZX Spectrum Next/+3 Tape Lead]] | ||
| − | + | ||
| − | + | To load from a player with a ''mono earphone'' socket: you can try to use, if you have it, a cable made for Spectrum +3 or later (see the picture: "ZX Spectrum Next/+3 Tape Lead"), or, you can try to obtain an [https://store.activeconsult.co.uk/shop?olsPage=products%2Fear-mic-cable&page=2 "Ear/Mic Cable"], or, as a possible substitution, a TRS stereo cable and a fitting stereo to mono adapter. | |
| − | + | ||
| − | + | All other scenarios need different solutions. Often, if the player has a 3.5mm ''stereo'' socket and the signal on its right channel sounds good, then a plain TRS cable with 3.5mm plugs on both sides could work (in TRS, the T stands for the "tip" and the R for the "ring" of the plug). Otherwise, including in the case where you want to connect a mono socket from the player and you can't obtain or use the linked "Ear/Mic Cable", the rule is still: the Next needs a clear and strong signal on its "ring" connection. The standard for analog stereo and AV cables or adapters which split the "stereo" side to separate channels on another side is to call the separated audio channels the left and the right channel and to assign white and red color to them, respectively. On those, the ''Red'' one is the one connected to the ''Ring'' needed by ZX Spectrum Next when loading. (Note 1: Memory aid: R-R-R, red-ring-right) (Note 2: Typically, the splitters to mono signals will have bigger sockets or plugs, called RCA: unless sockets on the player match, one splitter won't be the enough to construct the whole solution, but two can be combined, the second used to lead two, still separate, signals to a single multi-channel plug. A splitter allows to try which of the two channels from a stereo player has a better signal). (Note 3: when orienting the common splitters, the color mark from the historic +3 cable picture should be ignored: even if that cable is also a splitter, differently from the "stereo" convention, on it, the black side is the "right" one). | |
| − | + | ||
| − | and Tape Tester. | + | NextZXOS provides a Tape Tester in the main menu of NextZXOS – Select More and Tape Tester. It can help once you already have a signal but need to find the best volume or, in some cases, adjust the azimuth. Once you are ready to load a real tape choose the Tape Loader and press PLAY on your player. |
| − | |||
| − | |||
== How can I load TZX files? == | == How can I load TZX files? == | ||
| Line 51: | Line 79: | ||
== How do I update my Next? == | == How do I update my Next? == | ||
| − | + | Latest stable distro is [https://www.specnext.com/latestdistro/ here]. To update your Next, extract the contents of the distro to your SD card. Power down the Next, | |
Press and hold U and power on until you see the Updater screen and follow the instructions. As | Press and hold U and power on until you see the Updater screen and follow the instructions. As | ||
above if you are using HDMI you need to remove all cables when instructed to power off your | above if you are using HDMI you need to remove all cables when instructed to power off your | ||
Next. | Next. | ||
| + | |||
| + | You can also read [https://www.specnext.com/forum/viewtopic.php?p=13644 this forum post] by Allen with greater detail about the update process. | ||
| + | |||
| + | You may occasionally be directed to download the latest versions from gitlab [https://gitlab.com/SpectrumNext/ZX_Spectrum_Next_FPGA here]. Sometimes this is desirable if you're being asked to test a specific fix or recent hardware features. | ||
| + | |||
| + | == My SD card is not recognized by my Next during boot == | ||
| + | The Next supports FAT32 (including long filenames), FAT16 and FAT12. It does '''not''' support exFAT, NTFS, AFS or ext formats. Some disk formatters, such as the Windows GUI formatter and the SD Association Formatter, force exFAT for SD cards 32GB or larger, and will '''not''' let you format with FAT32. On Windows, format with <code>format x: /FS:FAT32</code> using the command line (where x: is the drive letter your card is mounted as). | ||
== How do I update the Pi in my Next (NextPi)? == | == How do I update the Pi in my Next (NextPi)? == | ||
| Line 81: | Line 116: | ||
== How do I sort the contents of my SD card? == | == How do I sort the contents of my SD card? == | ||
| − | + | On NextZXOS 2.07 and above, the browser can sort files dynamically. Press O to toggle between ordering by date, size and none. Press + (SYM+K) to toggle between ascending and descending order. | |
| + | |||
| + | For esxDOS or older versions of NextZXOS, you will need to use a tool on a PC such as [http://www.anerty.net/software/file/DriveSort/?lang=en DriveSort] (Windows) or [https://fatsort.sourceforge.io/ FatSort] (cross OS compatible) to physically reorder the files in the SD card's directory database. | ||
== Where do I buy RTC / Mouse / Memory / Wifi / Pi0 / Inline Power Switch… == | == Where do I buy RTC / Mouse / Memory / Wifi / Pi0 / Inline Power Switch… == | ||
| Line 93: | Line 130: | ||
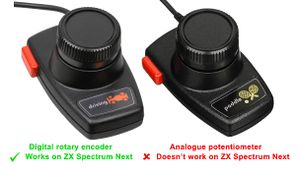
The Next also supports [https://www.atariage.com/controller_page.php?ControllerID=3&SystemID=2600 Atari 2600 driving controllers]. These are digital quadrature rotary encoder devices, identifiable by the word "driving" and picture of a racing car. [https://www.atariage.com/controller_page.php?SystemID=2600&ControllerID=2 Atari 2600 paddles] (identifiable by the word "paddle" and picture of tennis rackets) contain analogue potentiometers, which are '''NOT''' physically compatible and could damage your Next. | The Next also supports [https://www.atariage.com/controller_page.php?ControllerID=3&SystemID=2600 Atari 2600 driving controllers]. These are digital quadrature rotary encoder devices, identifiable by the word "driving" and picture of a racing car. [https://www.atariage.com/controller_page.php?SystemID=2600&ControllerID=2 Atari 2600 paddles] (identifiable by the word "paddle" and picture of tennis rackets) contain analogue potentiometers, which are '''NOT''' physically compatible and could damage your Next. | ||
| + | |||
| + | == How do I configure the joystick ports to be Kempston / Sinclair / Megadrive / Cursor? == | ||
| + | |||
| + | Your Next lets you configure how each joystick port behaves. By default the Left port will be configured to Kempston1 and Right will be Sinclair1. If you wish to change this configuration press the NMI button, Choose "Settings", then "Joysticks". You can now select JoyL for Left or JoyR for right and cycle through the options : <br> | ||
| + | <br> | ||
| + | Kempston1<br> | ||
| + | Kempston2<br> | ||
| + | Cursor<br> | ||
| + | Sinclair1 <br> | ||
| + | Sinclair2<br> | ||
| + | MD 1 (Megadrive 3/6 buttons)<br> | ||
| + | MD 2 (Megadrive 3/6 buttons)<br> | ||
| + | <br> | ||
| + | You cannot set both ports to the same configuration. This will only set the choice until a cold reboot (complete power off). You can set these options to be permanent by powering off your Next, on the Sinclair ZX Next boot screen hold down SPACE, then press 'E' - Change the options for Left Joy and Right Joy with SPACE. Once you have chosen your preferred joystick configuration press ENTER twice. Your Next will now reboot and once back into NextZXOS your settings will now be applied. <br> | ||
== My ZX ProPad Button 2 Doesn't Work == | == My ZX ProPad Button 2 Doesn't Work == | ||
| − | The Next only supports two directly wired fire buttons. On the ZX ProPad these are buttons 1 and 3. Additional buttons are supported for Sega Megadrive pads and sticks only. Both 3 and 6 button Sega pads are compatible, | + | The Next only supports two directly wired fire buttons. On the ZX ProPad these are buttons 1 and 3. Additional buttons are supported for Sega Megadrive pads and sticks only. Both 3 and 6 button Sega pads are compatible. Up, down, left, right, A, B, C, X, Y, Z, Start and Mode are all readable. |
| − | The limitation of two directly wired fire buttons on non-Sega pads and sticks is baked into the Next hardware, | + | The limitation of two directly wired fire buttons on non-Sega pads and sticks is baked into the Next hardware, unfortunately. So it cannot be enhanced in a future core update. All Next boards have a physical multiplex chip which hardwires six pins as input only (for direction and two fire buttons), one pin as output only (for Sega select), one pin as 5V, and one pin as ground. |
== How do I change the CPU speed/ Scanlines etc? == | == How do I change the CPU speed/ Scanlines etc? == | ||
The following keys combinations can be used to :<br> | The following keys combinations can be used to :<br> | ||
| Line 109: | Line 160: | ||
== Where can I download games / roms ? == | == Where can I download games / roms ? == | ||
| − | [https://spectrumcomputing.co.uk/ Spectrum Computing] and [https://www.worldofspectrum.org/ World of Spectrum] are good places to start | + | [https://spectrumcomputing.co.uk/ Spectrum Computing] and [https://www.worldofspectrum.org/ World of Spectrum] are good places to start. If your Next has wifi, [[https://github.com/em00k/next-zxdb-downloader zxdb-dl]] can also search and download directly on your Next. zxdb-dl is also on your SD card as part of the latest distro. |
== My internal keyboard is not responding – help!== | == My internal keyboard is not responding – help!== | ||
| Line 122: | Line 173: | ||
As above a guide on how to open your Next can be viewed. Also read the appropriate Chapter in the manual. | As above a guide on how to open your Next can be viewed. Also read the appropriate Chapter in the manual. | ||
[https://www.youtube.com/watch?v=iLDz4AjL3rA here]. | [https://www.youtube.com/watch?v=iLDz4AjL3rA here]. | ||
| + | |||
| + | == How do I connect to Wifi? == | ||
| + | You can connect to a 2.4Ghz wifi network, make sure your password does not contain spaces. You can use the application wifi2.bas from /apps/wifi/setup - when you load wifi2.bas and type RUN to start | ||
| + | |||
| + | You can confirm your IP address by going in to command line and typing .uart then the following: | ||
| + | |||
| + | AT+CIFSR | ||
| + | |||
| + | This should return your IP. If you are still having issues confirm the network is 2.4Ghz and you are not too far away from an access point. | ||
| + | |||
| + | See if other internet apps work, try ZXDB-DL from /apps/wifi/zxdb-dl and launch zxdb-loader.bas. When the program launches enter a game search term and press return. If you see results wifi is working. | ||
== How can I get the expansion bus working with external hardware? == | == How can I get the expansion bus working with external hardware? == | ||
| Line 148: | Line 210: | ||
== Further Spectrum Next Video Guides == | == Further Spectrum Next Video Guides == | ||
https://www.youtube.com/playlist?list=PL2lCM2mJCG_AonDyHJfqjxFR5VoqBWqoh | https://www.youtube.com/playlist?list=PL2lCM2mJCG_AonDyHJfqjxFR5VoqBWqoh | ||
| + | |||
| + | == Which Raspberry Pi Model Can I use for the Next Accelerator? == | ||
| + | Pi Zero 1.3 has fairly major design changes from 1.2, but as long as you’re using official NextPi images and using it as advised you should see no issues using the original 1.2 Pi Zero (the one without camera connectors). The Pi Zero 1.3 will also work just fine, and doesn’t use the camera connector even if found. | ||
| + | |||
| + | The Pi Zero W (all of 1.x ones) are very similar to the 1.3. NextPi can use it, and will disable the wireless. | ||
| + | |||
| + | It’s worth knowing that, ''in theory,'' someone could develop a plugin for NextPi that only works for the the non wireless version, but the only people to do that so far are the Next Team, to prove it was possible. | ||
| + | |||
| + | The Pi Zero 2 series is not supported, has never been supported, won’t work properly, and no support is offered or given into getting it to work properly. Neither are any other non-Zero Pi models, or clones such as Banana Pi. | ||
| + | |||
| + | Other, non-official, "NextPi-compatible" distributions are starting to come available, from 3rd party users and - so far - are NOT fully nextpi compatible, at all. | ||
== Essential Lesser-Known Technical Docs == | == Essential Lesser-Known Technical Docs == | ||
| Line 157: | Line 230: | ||
* Myopian's [https://docs.google.com/spreadsheets/d/1dB8fKIfByGJTts409Ud8ly450a6SLPnLZc-nCBghBl8 API spreadsheet] summarises NextZXOS/IDEDOS entry points along with calling conditions. | * Myopian's [https://docs.google.com/spreadsheets/d/1dB8fKIfByGJTts409Ud8ly450a6SLPnLZc-nCBghBl8 API spreadsheet] summarises NextZXOS/IDEDOS entry points along with calling conditions. | ||
* Myopian's [https://www.cs.hmc.edu/~oneill/specnext/dot-cmds.html dot command summary] collects together help and readme text for NextZXOS dot commands in one handy place. | * Myopian's [https://www.cs.hmc.edu/~oneill/specnext/dot-cmds.html dot command summary] collects together help and readme text for NextZXOS dot commands in one handy place. | ||
| − | |||
* Tomaz's [https://github.com/tomaz/zx-next-dev-guide/releases/latest ZX Spectrum Next Assembly Developer Guide] is almost like "User manual" for Assembly developers. | * Tomaz's [https://github.com/tomaz/zx-next-dev-guide/releases/latest ZX Spectrum Next Assembly Developer Guide] is almost like "User manual" for Assembly developers. | ||
| + | * Luzie/Rat Mal's [https://docs.google.com/spreadsheets/d/17-ifpHcy932_AP7SAv9uBLxg-2ZptcdgTvQ8ILXQLM4/edit?usp=sharing_eil&ts=599361c7 Almost (In-) Complete List of esxDOS DOT-Commands] attempts to list dot commands for several systems, including the Next. Some of the non-Next-specific commands may work on the Next, and some may only work on other FPGA/divMMC systems. | ||
Latest revision as of 16:05, 7 February 2024
Contents
- 1 I am using HDMI and I get no picture
- 2 How to use esxDOS with 48K mode
- 3 I am using VGA and I get no picture
- 4 I'm using an HDMI display and a game's graphics appear garbled
- 5 I am updating to the latest distro from GitLab or the N-Go website and my ps/2 keyboard doesn't work
- 6 My monitor shows wrong image with Soviet timings(Pentagon)
- 7 HELP! My <insert game name here> doesn't work while it works on my <insert older Spectrum model here>
- 8 What classic files can I load on my Next?
- 9 How to load from a software cassette tape
- 10 How can I load TZX files?
- 11 My LED does not go out when I unplug the power!
- 12 How do I update my Next?
- 13 My SD card is not recognized by my Next during boot
- 14 How do I update the Pi in my Next (NextPi)?
- 15 I have a pi0 but cannot get TZXs to load
- 16 How do I sort the contents of my SD card?
- 17 Where do I buy RTC / Mouse / Memory / Wifi / Pi0 / Inline Power Switch…
- 18 What controller / joystick / gamepad can I use?
- 19 How do I configure the joystick ports to be Kempston / Sinclair / Megadrive / Cursor?
- 20 My ZX ProPad Button 2 Doesn't Work
- 21 How do I change the CPU speed/ Scanlines etc?
- 22 Where can I download games / roms ?
- 23 My internal keyboard is not responding – help!
- 24 My ps/2 keyboard is not responding – help!
- 25 How do I install pi0 / Wifi / RTC / Memory?
- 26 How do I connect to Wifi?
- 27 How can I get the expansion bus working with external hardware?
- 28 Can I use Amstrad/Sinclair SJS-1 joysticks with the Next?
- 29 Why don't my VGA/joystick sockets have hex nuts to screw the cable in?
- 30 I thought I had the latest version of the distro?
- 31 Why doesn't the manual have a table of contents / index
- 32 Where can I download a copy of the manual with a ToC and index?
- 33 Further Spectrum Next Video Guides
- 34 Which Raspberry Pi Model Can I use for the Next Accelerator?
- 35 Essential Lesser-Known Technical Docs
I am using HDMI and I get no picture
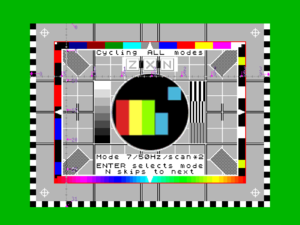
When the Next boots hold down D for DIGITAL (HDMI) – Mode 7 50hz / 60hz can be selected. N selects the next frequency, ENTER selects it and saves. ONLY PRESS ENTER if you actually see a screen like the one below. N is NOT necessary as the testscreen will automatically go to the next mode albeit slower.
You will also get an audible intermittent tone so you know your audio is working. It's possible your display can lock onto both modes but only one being able to lock onto the audio. Choose the one with the tone before pressing ENTER. Extract the files and copy over the BIN / SYS/ TMP folders to the root of your SD.
How to use esxDOS with 48K mode
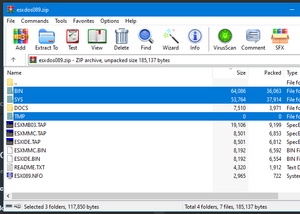
Your ZX Next can simulate the divMMC hardware for other machines. You can use esxDOS with 128/48K machines. You can download the latest esxDOS zip file here https://esxdos.org/index.html Download the zip and copy over the following folders BIN/SYS/TMP.
You will need to place the ESXMMC.BIN in to /machines/next/roms
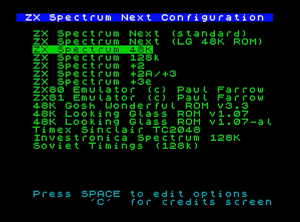
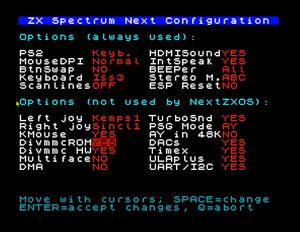
Boot up your Next and press SPACE to open the configuration menu. Use the arrow keys to select 48K Mode, SPACE again and ensure DIVmmc ROM = YES. Exit and save this configuration. When your Next boots it should show the esxDOS logo just before the (c)1982 Sinclair Research Ltd message.
I am using VGA and I get no picture
When the Next boots hold down V for VGA – Mode 0-6 50hz / 60hz can be selected. VGA0 is the preferred mode as this has accurate timings. 1 – 6 are also accurate timings but increase slightly in speed. N works as above but there are 12 possible configurations you can choose from. You'll start at VGA0@50Hz, next one will be the same at 60Hz and so forth. ENTER again selects and saves the changes. Audio is also being produced during the VGA Test Screen phase, however you will need powered speakers (or earphones) plugged in the audio out connector at the back of your Next.
I'm using an HDMI display and a game's graphics appear garbled
Some games (specifically ones with multicolour or border effects - eg. Nirvana/Bifrost engine games, certain demos particularly ex-Soviet demoscene ones) require precise timings as with a regular Spectrum. Due to the nature of HDMI displays and the lack of internal buffering on the Spectrum Next display hardware currently these will not work properly and require a VGA or RGB display. This is expected to be fixed in a future edition of the core/distribution but until then, there are a few alternative solutions: a. An extra Spectrum core that implements precise HDMI timings by removing some of the Next's extra features. b. Use of OSSC hardware which takes the Next's RGB/VGA display and converts it to HDMI independently c. Use of the ZXHD or TkPie hardware expansions (only for standard Spectrum modes at 3.5MHz clock) Next specific programs do not have this issue as they're made taking the current HDMI timing differences into account and will continue to work in the future when the most appropriate HDMI solution is implemented.
I am updating to the latest distro from GitLab or the N-Go website and my ps/2 keyboard doesn't work
To use a ps/2 keyboard you need to first choose whether you have a mouse or keyboard plugged into your ps/2 port. Unfortunately you can't get to the screen where you can make this choice until you have chosen your video mode on the testcard screen... which needs the keyboard to be already working!
Download this minimal config.ini file [1] and copy it to the /Machines/Next folder on your SD card, then try again.
When updating your distro from the official [Latest Distro] page, or when using the internal keyboard on your official kickstarter 1 or 2 Next, this problem will not occur.
My monitor shows wrong image with Soviet timings(Pentagon)
Pentagon has a non-standard screen refresh rate of 48.828Hz, some monitors do not support it. In some cases, can help manual picture settings in menu of your monitor. Another solution to the issue is to buy a monitor that is compatible with Pentagon timings. User-generated list of compatible monitors located here: http://www.nedopc.com/zxevo/zxevo_supported_monitors.pdf As a rule, monitors from this list are available on the secondary market at a low cost. Before purchasing desirable testing monitor with Pentagon mode.
HELP! My <insert game name here> doesn't work while it works on my <insert older Spectrum model here>
This is most likely due to a specific incompatibility of said program with the Next's extra hardware. The NextZXOS loader module, provides a lot of options for loading software catering to each model's idiosyncracies but also gives you the option to disable almost all Next extra hardware in order to make it work. If, after trying everything, the software doesn't work, you need to inform the team using the official gitlab repo "Issues" (registration is required) and provide a link to a copy of your program. The team will look at the specific issue and respond/fix the issue as soon as possible.
What classic files can I load on my Next?
The Next supports NEXs, TAPs (preferred for classic software), SNAs, DSKs, Z80s, SNXs which can be loaded from the browser menu by selecting them with the cursor keys and ENTER (or a joystick and Fire) -OR- by using the SPECTRUM command. (See Chapter 20 in the manual for details). Place the files on your SD card and pick from the Browser.
How to load from a software cassette tape
For a successful load a clear signal from the player has to arrive on the "ring" part of the plug which you insert in the EAR/MIC socket of your Next, as in the picture "Next's EAR/MIC socket wiring".
The plug inserted into the Next is referred to in many descriptions as a "3.5mm stereo plug". Even if the Next always uses a single channel to load, the plug on its side has to be the same as those used for stereo (two channel) equipment, because, as stated, it then receives the signal over the "ring", which doesn't exist on "mono" plugs. That's also why the cables delivered with the Spectrum 128 and earlier models won't work: their both sides lack the ring on their plugs.
So the cable on the Next's side needs a 3.5mm plug commonly described as a "stereo" plug. The other side will depend on the output socket on your cassette player.
To load from a player with a mono earphone socket: you can try to use, if you have it, a cable made for Spectrum +3 or later (see the picture: "ZX Spectrum Next/+3 Tape Lead"), or, you can try to obtain an "Ear/Mic Cable", or, as a possible substitution, a TRS stereo cable and a fitting stereo to mono adapter.
All other scenarios need different solutions. Often, if the player has a 3.5mm stereo socket and the signal on its right channel sounds good, then a plain TRS cable with 3.5mm plugs on both sides could work (in TRS, the T stands for the "tip" and the R for the "ring" of the plug). Otherwise, including in the case where you want to connect a mono socket from the player and you can't obtain or use the linked "Ear/Mic Cable", the rule is still: the Next needs a clear and strong signal on its "ring" connection. The standard for analog stereo and AV cables or adapters which split the "stereo" side to separate channels on another side is to call the separated audio channels the left and the right channel and to assign white and red color to them, respectively. On those, the Red one is the one connected to the Ring needed by ZX Spectrum Next when loading. (Note 1: Memory aid: R-R-R, red-ring-right) (Note 2: Typically, the splitters to mono signals will have bigger sockets or plugs, called RCA: unless sockets on the player match, one splitter won't be the enough to construct the whole solution, but two can be combined, the second used to lead two, still separate, signals to a single multi-channel plug. A splitter allows to try which of the two channels from a stereo player has a better signal). (Note 3: when orienting the common splitters, the color mark from the historic +3 cable picture should be ignored: even if that cable is also a splitter, differently from the "stereo" convention, on it, the black side is the "right" one).
NextZXOS provides a Tape Tester in the main menu of NextZXOS – Select More and Tape Tester. It can help once you already have a signal but need to find the best volume or, in some cases, adjust the azimuth. Once you are ready to load a real tape choose the Tape Loader and press PLAY on your player.
How can I load TZX files?
TZX files can be loaded if you have a pi0 or an external TZX player. If you have a pi0 please see
below for more information. Before asking for help please have this information ready
My LED does not go out when I unplug the power!
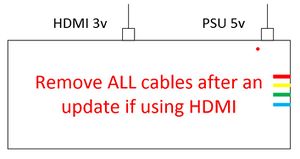
Some TVs will back-power the Next through the HDMI cable, so it’s important to REMOVE ALL CABLES after a firmware update and to turn off completely. If your TV/Display has multiple inputs try using one of the other ones as usually NOT ALL HDMI ports exhibit this behaviour.
The back-power situation also happened in one case with I/O serial cable used at joystick port, general rule seems to be "if it has own power, and is connected to Next, it may back-power it" - in case of problems to power-cycle the Next properly, unplug all such cables/peripherals first and try again.
How do I update my Next?
Latest stable distro is here. To update your Next, extract the contents of the distro to your SD card. Power down the Next, Press and hold U and power on until you see the Updater screen and follow the instructions. As above if you are using HDMI you need to remove all cables when instructed to power off your Next.
You can also read this forum post by Allen with greater detail about the update process.
You may occasionally be directed to download the latest versions from gitlab here. Sometimes this is desirable if you're being asked to test a specific fix or recent hardware features.
My SD card is not recognized by my Next during boot
The Next supports FAT32 (including long filenames), FAT16 and FAT12. It does not support exFAT, NTFS, AFS or ext formats. Some disk formatters, such as the Windows GUI formatter and the SD Association Formatter, force exFAT for SD cards 32GB or larger, and will not let you format with FAT32. On Windows, format with format x: /FS:FAT32 using the command line (where x: is the drive letter your card is mounted as).
How do I update the Pi in my Next (NextPi)?
NextPi can be downloaded here, and you can use Etcher to write this to a 1GB SD card.
I have a pi0 but cannot get TZXs to load
You will require a new updated dot/pisend and nextzxos/tzxload.bas from the
git repository. These need to be placed in the correct folders on your SD
card. These files have updated after the distro was released.
You can check if the pi0 is correctly responding by going into Command Line and running “.term”
You should see Terminex, press SYM+SHIFT+B to switch to 115,200 baud and press Enter. If you
see the words “SUP>” then your pi0 is ready. You can quit Terminex by pressing SYM+SHIFT+Q
To load a TZX, place some TZX files on your SD card and you should be able to select the files from the Browser and the Next should do the rest. If you come across a game that doesn’t work please let us know.
I have problems loading TZXs:
Are you on the latest core / NextZXOS?
Have you updated to the latest git distro? git repository
What video mode are you using? (VGA0/HDMI etc)
What game didn't work? (You need to supply the exact name)
Where did the loading fail? Did the game load fine but crash etc?
Have you left something plugged into the EAR port?
How do I sort the contents of my SD card?
On NextZXOS 2.07 and above, the browser can sort files dynamically. Press O to toggle between ordering by date, size and none. Press + (SYM+K) to toggle between ascending and descending order.
For esxDOS or older versions of NextZXOS, you will need to use a tool on a PC such as DriveSort (Windows) or FatSort (cross OS compatible) to physically reorder the files in the SD card's directory database.
Where do I buy RTC / Mouse / Memory / Wifi / Pi0 / Inline Power Switch…
ActiveConsult sell most of these products and can be found here. SCART cables can be purchased here, also here: [2] NOTE that you will need to boot your ZX Spectrum Next and press the R key to set up the SCART output.
What controller / joystick / gamepad can I use?
The Next supports any “Atari” standard joystick or gamepad, along with Master System and MegaDrive pads. A good option is the M30 8BitDo wireless MegaDrive pad.
You CANNOT use the Sinclair Branded SJS-1 joysticks sold for +2/2A/3 ZX Spectrums as they require a special adapter. If your joystick has both black and grey plugs, DO NOT plug in the grey plug, as that only works on +2/2A/3 ZX Spectrums and will damage your Next.
The Next also supports Atari 2600 driving controllers. These are digital quadrature rotary encoder devices, identifiable by the word "driving" and picture of a racing car. Atari 2600 paddles (identifiable by the word "paddle" and picture of tennis rackets) contain analogue potentiometers, which are NOT physically compatible and could damage your Next.
How do I configure the joystick ports to be Kempston / Sinclair / Megadrive / Cursor?
Your Next lets you configure how each joystick port behaves. By default the Left port will be configured to Kempston1 and Right will be Sinclair1. If you wish to change this configuration press the NMI button, Choose "Settings", then "Joysticks". You can now select JoyL for Left or JoyR for right and cycle through the options :
Kempston1
Kempston2
Cursor
Sinclair1
Sinclair2
MD 1 (Megadrive 3/6 buttons)
MD 2 (Megadrive 3/6 buttons)
You cannot set both ports to the same configuration. This will only set the choice until a cold reboot (complete power off). You can set these options to be permanent by powering off your Next, on the Sinclair ZX Next boot screen hold down SPACE, then press 'E' - Change the options for Left Joy and Right Joy with SPACE. Once you have chosen your preferred joystick configuration press ENTER twice. Your Next will now reboot and once back into NextZXOS your settings will now be applied.
My ZX ProPad Button 2 Doesn't Work
The Next only supports two directly wired fire buttons. On the ZX ProPad these are buttons 1 and 3. Additional buttons are supported for Sega Megadrive pads and sticks only. Both 3 and 6 button Sega pads are compatible. Up, down, left, right, A, B, C, X, Y, Z, Start and Mode are all readable.
The limitation of two directly wired fire buttons on non-Sega pads and sticks is baked into the Next hardware, unfortunately. So it cannot be enhanced in a future core update. All Next boards have a physical multiplex chip which hardwires six pins as input only (for direction and two fire buttons), one pin as output only (for Sega select), one pin as 5V, and one pin as ground.
How do I change the CPU speed/ Scanlines etc?
The following keys combinations can be used to :
NMI + 1 Hard reset
NMI + 2 toggle scan doubler
NMI + 3 toggle 50 / 60 Hz
NMI + 4 Soft reset
NMI + 7 Toggle scan lines (25/50/75%)
NMI + 8 Toggle CPU speed (3.5/7/14/28)
NMI + 9 NMI menu
Where can I download games / roms ?
Spectrum Computing and World of Spectrum are good places to start. If your Next has wifi, [zxdb-dl] can also search and download directly on your Next. zxdb-dl is also on your SD card as part of the latest distro.
My internal keyboard is not responding – help!
First turn off the Next completely and remove all cables and try again. Failing that a keyboard
cable may have become loose. You can watch a video on how to open your Next here:
https://www.youtube.com/watch?v=iLDz4AjL3rA
My ps/2 keyboard is not responding – help!
Edit your c:/machines/next/config.ini file so that ps2=0, or use a ps/2 splitter.
How do I install pi0 / Wifi / RTC / Memory?
As above a guide on how to open your Next can be viewed. Also read the appropriate Chapter in the manual. here.
How do I connect to Wifi?
You can connect to a 2.4Ghz wifi network, make sure your password does not contain spaces. You can use the application wifi2.bas from /apps/wifi/setup - when you load wifi2.bas and type RUN to start
You can confirm your IP address by going in to command line and typing .uart then the following:
AT+CIFSR
This should return your IP. If you are still having issues confirm the network is 2.4Ghz and you are not too far away from an access point.
See if other internet apps work, try ZXDB-DL from /apps/wifi/zxdb-dl and launch zxdb-loader.bas. When the program launches enter a game search term and press return. If you see results wifi is working.
How can I get the expansion bus working with external hardware?
By default, the Next disables the expansion bus, as external hardware can conflict and is unlikely to run at CPU speeds faster than 3.5MHz. The bus can be enabled and and individual conflicting internal hardware disabled through Next registers 128 and 130..137 (manual pages 270..271). Here is a detailed example of getting the RAM Music Machine working, and here is a video demonstrating unsing Interface 1/microdrives.
Can I use Amstrad/Sinclair SJS-1 joysticks with the Next?
NO! SJS-1 joysticks have fundamentally incompatible wiring compared with the standard Atari-wired joysticks the Next uses. Using them on the Next will short the 5V line to ground, potentially damaging your Next. Bin them, sell them, or keep them for your original +2, +2A or +3, where they will work fine but still be quite rubbish.
Why don't my VGA/joystick sockets have hex nuts to screw the cable in?
VGA sockets with hex nuts are typically bolted to a metal chassis. On the Next there is no chassis to screw onto, so you would just be screwing into the connector which is a VERY bad idea. The Next sockets are only fixed tight with small solder pads. VGA cables are heavy and will put a lot of leverage on the VGA PCB pins, and likely to fracture the PCB or pins on the VGA socket. An unscrewed cable will still stay firmly in the socket during normal use, but will safely unplug if you yank the cable or leverage the plug.
I thought I had the latest version of the distro?
Go by the version numbers of the firmware, core and NextZXOS when deciding if you have the latest version. Ignore the post date on the latest distro page. Wordpress post dates don't automatically update when existing posts are edited.
Why doesn't the manual have a table of contents / index
Short answer: It didn't fit in the box as the boxes were made way before the manual was completed. Long answer: TL;DR :)
Where can I download a copy of the manual with a ToC and index?
Right here : https://www.specnext.com/zx-spectrum-next-user-manual-first-edition/
Myopian's fixed version displays correctly in Safari, and can be read directly in browsers.
Further Spectrum Next Video Guides
https://www.youtube.com/playlist?list=PL2lCM2mJCG_AonDyHJfqjxFR5VoqBWqoh
Which Raspberry Pi Model Can I use for the Next Accelerator?
Pi Zero 1.3 has fairly major design changes from 1.2, but as long as you’re using official NextPi images and using it as advised you should see no issues using the original 1.2 Pi Zero (the one without camera connectors). The Pi Zero 1.3 will also work just fine, and doesn’t use the camera connector even if found.
The Pi Zero W (all of 1.x ones) are very similar to the 1.3. NextPi can use it, and will disable the wireless.
It’s worth knowing that, in theory, someone could develop a plugin for NextPi that only works for the the non wireless version, but the only people to do that so far are the Next Team, to prove it was possible.
The Pi Zero 2 series is not supported, has never been supported, won’t work properly, and no support is offered or given into getting it to work properly. Neither are any other non-Zero Pi models, or clones such as Banana Pi.
Other, non-official, "NextPi-compatible" distributions are starting to come available, from 3rd party users and - so far - are NOT fully nextpi compatible, at all.
Essential Lesser-Known Technical Docs
- The master nextreg and port lists are kept up to date, and fully describe the Next hardware for developers.
- The pinouts list has detailed information on connectors.
- The NextZXOS change log details what was new and fixed in each version of NextZXOS/NextBASIC.
- The four NextZXOS PDFs have detailed information on the NextZXOS and esxDOS APIs, NextBASIC sysvars, and NextBASIC syntax.
- varmfskii's ZX Spectrum Next Programming Notes are an attempt to consolidate the Next programming interface into a single location.
- Myopian's API spreadsheet summarises NextZXOS/IDEDOS entry points along with calling conditions.
- Myopian's dot command summary collects together help and readme text for NextZXOS dot commands in one handy place.
- Tomaz's ZX Spectrum Next Assembly Developer Guide is almost like "User manual" for Assembly developers.
- Luzie/Rat Mal's Almost (In-) Complete List of esxDOS DOT-Commands attempts to list dot commands for several systems, including the Next. Some of the non-Next-specific commands may work on the Next, and some may only work on other FPGA/divMMC systems.

